Laravel
- Performance in Laravel
- design and test a scalable, secure Laravel backend for production
- laravel eloquent 3 ways to fetch first 3 rows ascending
- swager ui for laravel
- Filament in laravel
- Prism PHP
- Recommended Resources
- Laravel HTML Minify
- zend framework vs laravel
- codeignitor vs laravel
- core php vs laravel performance
- wordpress framework vs laravel
- cakephp framework vs laravel
- opencart vs bagisto
- laravel-ai-email-assistant - github.com
- Why migrate to laravel
- Laravel Forge
- Laravel Vapor
- silviolleite/laravel-pwa vs erag/laravel-pwa
- Steps to Add PWA Functionality in laravel website
- Implementing the erag/laravel-pwa package
- launch_handler in manifest of PWA
- import an SQL file
- export a full SQL dump of your database
- how to license a laravel application
- Installation Script
- Asynchronous Calls
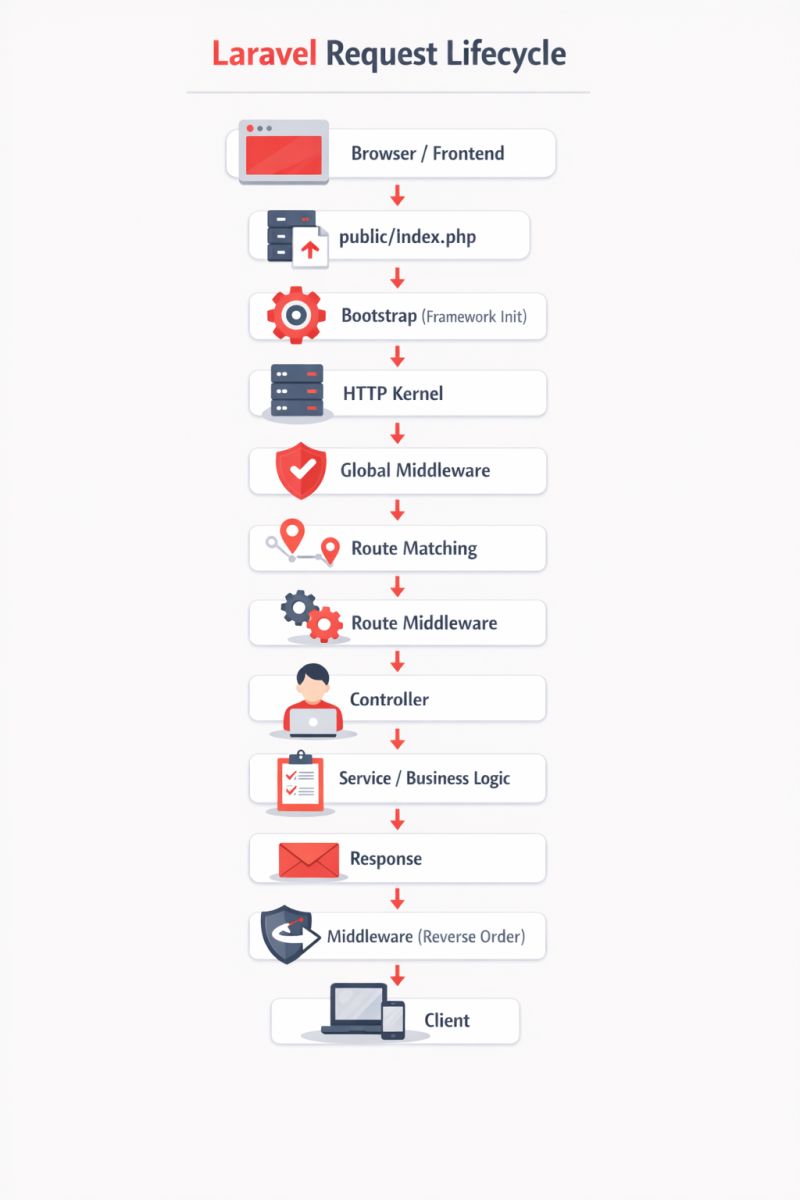
- Laravel Request LifeCycle
- Laravel request lifecycle in simple terms
- Design an API for an eCommerce order system
- What are the steps to secure a REST API in Laravel?
Performance in Laravel
- Eager Loading (N+1 Problem): Avoid the N+1 query problem by using
with()to eager load relationships, fetching all related models in a single query.
$users = User::with('posts')->get();- Select Specific Columns: Retrieve only necessary columns using
select()to reduce memory footprint and query time.
$users = User::select('id', 'name', 'email')->get();-
Ensure appropriate indexes are created on frequently queried columns in your database tables.
-
Utilize methods like
insert()orupdate()for bulk operations instead of individual Eloquent saves within a loop. -
When processing a large number of records, use
chunk()to retrieve them in smaller batches, preventing memory exhaustion.
    User::chunk(100, function ($users) {
        foreach ($users as $user) {
            // Process user
        }
});-
In production, cache routes and configuration using
php artisan route:cacheandphp artisan config:cacheto speed up application bootstrapping. -
Cache results of expensive or frequently accessed database queries using
Cache::remember()orCache::rememberForever().
    $users = Cache::remember('all_users', $minutes, function () {
        return User::all();
});- View Caching: Cache rendered Blade views, especially for static or rarely changing content, to reduce view compilation time.
- Object Caching: Cache entire Eloquent models or collections that are frequently accessed.
- Redis or Memcached: Use a robust caching driver like Redis or Memcached for better performance and scalability compared to file-based caching.
- Offload Heavy Tasks: Move time-consuming operations like sending emails, processing images, or generating reports to queues using
dispatch().
SendWelcomeEmail::dispatch($user);-
Set up dedicated queue workers (e.g., using Supervisor or Laravel Horizon) to process jobs asynchronously.
-
Assign different priorities to jobs, ensuring critical tasks are processed first.
-
Implement monitoring (e.g., with Laravel Horizon) to track queue performance, identify bottlenecks, and ensure jobs are processed effectively.
-
Remember to restart queue workers after deployments using
php artisan queue:restartto pick up new code changes
design and test a scalable, secure Laravel backend for production
-
- Design an efficient database schema with appropriate indexing.
- Choose suitable data types and consider trade-offs between normalization and denormalization.
- Utilize database read replicas for heavy reporting or analytics.
-
Implement robust caching strategies using tools like Redis for route responses, views, query results, and external API calls.
-
Offload time-consuming tasks (e.g., email sending, report generation) to queues using Laravel's queue system to prevent blocking HTTP requests.
-
Deploy the application across multiple servers and use a load balancer to distribute traffic. Consider a microservices architecture for independent scaling of components.
-
Employ a modular architecture (e.g., Service-Oriented Architecture, Service Pattern) to separate concerns and facilitate independent scaling and maintenance.
- HTTPS: Enforce HTTPS to encrypt data in transit using an SSL certificate.
- Input Validation and Sanitization: Rigorously validate and sanitize all user input to prevent common vulnerabilities like SQL injection and XSS attacks.
- Authentication and Authorization: Leverage Laravel's built-in authentication and authorization features, including middleware for access control based on user roles and permissions.
- Password Hashing: Store user passwords securely using Laravel's built-in hashing mechanisms. Never store plain-text passwords.
- CSRF Protection: Ensure Laravel's built-in CSRF protection is enabled to prevent cross-site request forgery attacks.
- Regular Updates: Keep Laravel and its dependencies updated to benefit from security patches.
- Secure Coding Practices: Follow secure coding best practices throughout the development process.
-
Write comprehensive unit tests for individual components (e.g., service classes, models) to ensure their correctness and reliability.
-
Develop integration tests to verify the interaction between different parts of the application and external services.
-
Create feature tests to simulate user interactions and ensure the application behaves as expected.
-
- Use tools like k6 to simulate high user loads and assess the application's performance under stress.
- Monitor key metrics like response times, resource utilization, and database query performance.
-
Conduct vulnerability scanning and penetration testing to identify and address security weaknesses.
-
Implement robust performance monitoring tools (e.g., New Relic, ScoutAPM, Datadog) and comprehensive logging to track application behavior, identify bottlenecks, and troubleshoot issues in production.
-
Test the deployment process in a staging environment that mirrors production to ensure smooth and reliable deployments
laravel eloquent 3 ways to fetch first 3 rows ascending
use App\Models\YourModel; // Replace YourModel with your actual model name

// Method 1: Order by a specific column in ascending order and take the first 3
$records = YourModel::orderBy('column_name', 'asc')->take(3)->get();

// Method 2: If you want to order by the primary key (e.g., 'id') in ascending order
$records = YourModel::orderBy('id', 'asc')->take(3)->get();

// Method 3: Using 'oldest()' which orders by 'created_at' in ascending order by default
$records = YourModel::oldest()->take(3)->get();-
This specifies the column by which you want to sort the results and the order ('asc' for ascending, 'desc' for descending). Replace
'column_name'with the actual column you want to sort by. -
This limits the number of results retrieved from the database to the first three records after the ordering has been applied.
-
This executes the query and retrieves the results as an Eloquent Collection.
-
This is a convenient method that automatically orders the results by the
created_attimestamp in ascending order. If your table hascreated_atandupdated_attimestamps, this is often a good default for fetching the oldest records
swager ui for laravel
darkaonline/l5-swagger package is a popular choice for this purpose.- Install the package: Add the package to your Laravel project using Composer:
composer require darkaonline/l5-swagger- Publish configuration and views: After installation, publish the necessary configuration files and views:
php artisan vendor:publish --provider "L5Swagger\L5SwaggerServiceProvider"config/l5-swagger.php file where you can customize various settings, including the API title, documentation routes, and more.-
Add Swagger annotations (using
@OAfor OpenAPI) to your controllers and routes to describe your API endpoints, parameters, responses, and security schemes. These annotations are crucial for generating the Swagger documentation. -
After annotating your code, generate the Swagger documentation file (usually
openapi.jsonoropenapi.yaml) by running:
php artisan l5-swagger:generate- Access Swagger UI: Once the documentation is generated, you can access the interactive Swagger UI in your browser by navigating to the configured route, typically
/api/documentation(or the path defined inconfig/l5-swagger.php).
-
Provides a clear and interactive interface for exploring your API endpoints, their parameters, and expected responses.
-
Can be used to generate client SDKs or server stubs based on your API definition.
-
The
l5-swagger.phpconfiguration file allows extensive customization of the UI, routes, and documentation generation. -
You can configure OAuth2 or other authorization methods within Swagger UI to test authenticated API endpoints.
-
The package can automatically adapt the base URL in the Swagger UI to your current Laravel environment.
-
Implement custom gates to restrict access to the Swagger UI in non-local environments.
Filament in laravel
-
Accelerated development: Filament provides a rapid way to build interfaces by handling much of the front-end development, including a modern and responsive user interface.
-
Comprehensive component library: It comes with a rich set of pre-built components for common needs like rendering tables with filters, creating forms, displaying dashboards, and sending notifications.
-
TALL stack foundation: Filament leverages the TALL stack, using Livewire for dynamic, reactive interfaces without custom JavaScript, Alpine.js for interactivity, and Tailwind CSS for styling.
-
Server-Driven UI (SDUI): This approach means the UI is generated and driven by the server, allowing developers to build complex interfaces using PHP classes and configurations without writing a lot of custom HTML or JavaScript.
-
Resource-based approach: Filament uses a resource-based system, where each resource (like "Customer" or "Product") can have a corresponding admin interface for managing its data, which can be generated with a single command.
-
Extensive ecosystem: An ecosystem of official and third-party plugins is available to add extra functionality, such as media managers, relation managers, and user impersonation.
Prism PHP
-
Offers a single, consistent API for interacting with multiple AI providers, abstracting away the complexities of different provider-specific APIs.
-
Enables easy switching between different AI providers by simply changing a configuration option, without requiring significant code modifications.
-
Simplifies the generation of text using LLMs, with options for controlling parameters like temperature and topP.
-
Facilitates the generation and parsing of structured outputs from LLMs, which is crucial for building applications that require specific data formats.
-
Supports handling of various input types, including text, and offers features like speech-to-text and text-to-speech.
-
Provides a mechanism for defining and utilizing tools or functions that LLMs can call to perform specific actions or retrieve information.
-
Allows the use of Blade templates for defining and managing AI prompts, promoting reusability and maintainability.
-
Enables the creation of local AI model servers within your Laravel application, allowing for direct interaction with models.
Recommended Resources
.
Below are general recommendations for small, medium, large, and enterprise-level Laravel applications:
| Resource Type | Small Application (e.g., blog, simple internal tool) | Medium Application (e.g., e-commerce, CMS) | Large Application (e.g., social network, SaaS) | Enterprise Application (e.g., mission-critical, very high traffic) |
|---|---|---|---|---|
| CPU | 1-2 vCPUs | 2-4 vCPUs | 4-8 vCPUs | 8+ vCPUs |
| Server RAM (Total) | 2-4 GB | 4-8 GB | 8-16 GB | 16-32+ GB |
| RAM Allocated to PHP | 512 MB - 1 GB (memory limit per script) | 1-2 GB | 2-4 GB | 4-8+ GB |
| RAM Allocated to DB Server | 512 MB - 1 GB | 1-2 GB | 2-4 GB | 4-8+ GB |
| Hard Disk Space | 20-50 GB SSD | 50-100 GB SSD | 100-200 GB SSD (or more) | 200 GB - 1 TB SSD (or more) |
- Traffic and Complexity The primary drivers for resource needs are the expected traffic volume and the complexity of application logic.
- Database Performance A well-designed database and efficient queries are critical. Ensure sufficient RAM for the database server (especially for the InnoDB buffer pool in MySQL) to optimize data access speed.
- Caching and Queues Implementing caching mechanisms (like Redis or Memcached) and using Laravel's built-in queue system to offload resource-intensive tasks can significantly improve performance and reduce immediate resource consumption.
- Disk Type Using SSD or NVMe storage is highly recommended for better performance compared to traditional hard drives.
- OS Overhead Always reserve an additional amount of RAM (e.g., 1 GB for the OS by default) to ensure system stability.
- Monitoring Continuously monitor CPU and memory usage to identify bottlenecks and scale resources proactively rather than waiting for performance issues to arise.
- Separation of Concerns For large or enterprise applications, consider running the web application and the database on separate, dedicated servers to optimize performance and availability
Laravel HTML Minify
How it works (general principle):
- Removing whitespace: Multiple spaces, tabs, and newlines are reduced to a single space or removed entirely where appropriate.
- Stripping comments: HTML comments (<!-- ... -->) are removed as they are not needed by the browser.
- Optimizing attributes: Redundant or unnecessary attributes in HTML tags might be removed.
zend framework vs laravel
| Feature | Laravel | Laminas (formerly Zend) |
|---|---|---|
| Primary Focus | Rapid development, developer ergonomics, ease of use | Enterprise-level applications, high performance, strict standards |
| Learning Curve | Gentle, beginner-friendly | Steep, requires deep PHP knowledge |
| Architecture | Opinionated, full-stack framework with "batteries-included" | Highly modular, component-based, allowing use of only needed parts |
| Community | Very large, vibrant, and active community with extensive resources | Strong, but smaller and more focused on enterprise development |
| Key Features | Eloquent ORM, Blade templating, Artisan CLI, built-in Auth, queues | Adherence to PSR standards, powerful dependency injection, event-driven architecture |
| Use Cases | Startups, small to medium-sized projects, general web apps | Large-scale, complex projects with specific architectural requirements |
- Choose Laravel if you prioritize development speed, have a smaller team, or need a wide range of integrated tools and a supportive community for general web development. Its elegant syntax and built-in features (like authentication and ORM) speed up the process significantly.
- Choose Zend/Laminas if you are working on a large enterprise project with rigorous architectural standards, performance needs, and a team of experienced developers who can manage its complexity and modular nature. Its focus is on stability, scalability, and security for mission-critical applications.
codeignitor vs laravel
| Parameter | Laravel | CodeIgniter |
|---|---|---|
| Performance | Slower due to feature-rich nature, but optimized for large scale. | Faster execution and minimal overhead. |
| Learning Curve | Moderate to steep; requires understanding of modern PHP concepts and OOP. | Gentle; very beginner-friendly and easy to learn. |
| Key Features | Extensive built-in features: Eloquent ORM, Blade templating engine, Artisan CLI, built-in authentication, queue management, task scheduling. | Minimalistic core, providing basic libraries for common tasks like form validation, session management, and database abstraction (Query Builder). |
| Scalability | Designed for high scalability with built-in tools like caching and queues; ideal for large applications. | Scalable but requires more manual configuration and third-party tools for complex scaling needs. |
| Security | Robust, with built-in features for XSS/CSRF protection, SQL injection prevention, and authentication/authorization. | Basic security features that may require more manual setup for advanced protection. |
| Community | Large, active, and vibrant community with extensive documentation and resources like Laracasts. | Smaller, but dedicated and supportive community with clear documentation. |
- You are building a complex, enterprise-level application that requires robust features, security, and scalability out of the box.
- You have an experienced development team comfortable with Object-Oriented Programming (OOP) and modern development practices.
- You need built-in support for tasks like API development, queue management, and task scheduling.
- You need a lightweight application that prioritizes raw performance and speed.
- You are working on a small to medium-sized project or a rapid prototype with a tight deadline.
- You or your team are new to PHP frameworks and prefer a gentle learning curve with minimal configuration.
core php vs laravel performance
- Speed: It is lightweight, and when code is written efficiently, it can process commands and handle high concurrency rates very quickly, as there are no extra layers of abstraction to slow it down.
- Optimization: Performance relies entirely on the developer's skill in writing optimized code, managing database queries manually, and implementing caching solutions like OPcache without third-party libraries.
- Scalability: While flexible, scaling a Core PHP application can be challenging as the developer is responsible for re-organizing code and ensuring maintainability as the project grows.
- Speed: The initial loading of the framework adds a small delay. However, Laravel offers robust built-in tools like a powerful queue system for background tasks and various caching backends (Redis, Memcached) that significantly improve response times in complex scenarios.
- Optimization: It provides built-in tools for performance optimization, such as the Eloquent ORM (which uses prepared statements to prevent SQL injection), query optimization tools, and an Artisan CLI for command-line tasks.
- Scalability: Laravel is designed for scalability with its modular MVC architecture, making it easier to build and maintain large-scale applications that can handle high traffic and increased demands.
| Feature | Core PHP | Laravel |
|---|---|---|
| Raw Speed (Small Apps) | Faster (minimal overhead) | Slightly Slower (framework overhead) |
| Scalability (Large Apps) | Difficult; requires significant manual effort | Excellent; built-in features simplify scaling |
| Optimization | Manual; relies on developer expertise | Built-in features (caching, queues, ORM) |
| Development Speed | Slower (everything built from scratch) | Faster (pre-built components, modules) |
| Security | Manual implementation required | Built-in security features (CSRF, SQL injection) |
wordpress framework vs laravel
| Feature | WordPress | Laravel |
|---|---|---|
| Type | Content Management System (CMS) | PHP Web Application Framework |
| User Base | Non-technical users, bloggers, marketers | Developers, engineering teams |
| Learning Curve | Low (beginner-friendly) | Steep (requires PHP/MVC knowledge) |
| Development Speed | Fast for standard websites (blogs, portfolios) | Slower initially; faster for complex custom features |
| Customization | Relies on themes and plugins; limited for complex logic | Full control; allows building unique features from scratch |
| Security | Core is secure, but vulnerable via outdated plugins/themes | Strong built-in features (CSRF, XSS protection, authentication) |
| Performance | Can be slowed by too many plugins; needs optimization | Optimized for high performance and scalability in custom apps |
| Cost | Lower initial cost; uses many free resources | Higher initial cost due to need for skilled developers |
| SEO | Excellent native tools and plugins (Yoast SEO, Rank Math) | Requires manual implementation but offers full control over technical SEO |
- You need to launch a website quickly and on a limited budget.
- Your primary goal is content publishing (blogs, news sites, portfolios) and ease of content management for non-technical users.
- You rely on pre-built themes and plugins to add functionality (e.g., a basic e-commerce store with WooCommerce).
- You do not have a dedicated development team or extensive coding knowledge.
- You are building a complex, custom web application, SaaS platform, or enterprise-level solution (e.g., custom CRMs, booking systems, complex marketplaces).
- You require specific business logic, advanced integrations, and complete control over the application's architecture, security, and performance.
- Scalability and long-term performance under heavy traffic are non-negotiable requirements.
- You have access to experienced PHP developers who are proficient in the MVC (Model-View-Controller) architecture.
cakephp framework vs laravel
| Feature | CakePHP | Laravel |
|---|---|---|
| Best For | Small to medium projects, rapid development, maintenance tasks | Large-scale, complex, and scalable enterprise applications |
| Architecture | Hierarchical MVC (HMVC) | Model-View-Controller (MVC) |
| Scalability | Less scalable; better suited for smaller datasets | Highly scalable; handles large datasets efficiently |
| Security | Generally considered more secure with robust built-in features (CSRF, form tampering, encryption) | Good security features (authentication, password validation, CSRF protection) but fewer built-in advanced tools than CakePHP |
| Learning Curve | Considered easier to learn for beginners due to strong conventions | Steeper learning curve, especially for newcomers to complex features, but excellent documentation and community support are available |
| Ecosystem & Tools | Strong conventions, built-in ORM, and plugins; fewer "extras" than Laravel | Extensive ecosystem with robust tools like the Blade templating engine, Artisan CLI, and official services (Forge, Vapor) |
- Performance: CakePHP can be faster for common or simple tasks, but Laravel is optimized for performance in complex, large-scale projects due to its query builder and advanced features.
- Community and Support: Laravel boasts a significantly larger and more active community, which translates to a wealth of tutorials, packages, and resources like Laracasts. CakePHP has a loyal user base and a responsive community as well, but fewer community-driven resources overall.
- Routing: CakePHP generally offers a simpler and more practical approach to routing than Laravel, which has a more complex, two-way data binding process.
- Development Speed: CakePHP's "convention over configuration" approach and code generation (scaffolding) allow for very rapid initial development and prototyping. Laravel also promotes fast development with its command-line interface (Artisan) and ready-to-use components, making complex tasks efficient.
- Cost: Hiring experienced Laravel developers can often be more expensive due to higher demand and the framework's popularity. CakePHP development is generally a more economical option.
opencart vs bagisto
- Pros: Long-standing, good for basic stores, large community, free core.
- Cons: Can feel dated, less intuitive for complex needs, potentially steeper learning curve for advanced features.
- Pros: Built on Laravel (modern PHP framework), excellent for multi-vendor/channel, supports subscriptions/bookings, easier product creation, headless/multi-tenant ready, pure RTL support.
- Cons: Newer, so community/extensions might be less vast than OpenCart's; needs more guidance on package/module development.
- Choose OpenCart if: You're starting a simple, small-to-medium-sized store and need something straightforward and widely supported.
- Choose Bagisto if: You're building a complex marketplace, need multi-channel inventory, want modern features (subscriptions, headless), or prefer a Laravel-based, scalable platform.
laravel-ai-email-assistant - github.com
laravel-ai-email-assistant - github.com
Description
This package can generate an email from a prompt with the OpenAI GPT API.
It provides a Laravel service class that can build a prompt to request the generation of email messages.
The package can call the OpenAI GPT API to request the generation of a personalized email message based on the prompt request text.
It can:
- Use predefined tone and style options
- Use custom prompts and message templates
Instructions
Install the package using Composer.
Configure your OpenAI API key in .env.
Use the included AIEmailService service to generate or draft emails dynamically.
Integrate it into your controller or automation workflows.
Details
? Laravel AI Email Assistant (by OmDiaries)
AI-powered Email Assistant for Laravel 9, 10, and 11 ? automatically generate personalized, well-structured emails (welcome, follow-up, sales pitch, and more) using OpenAI or other AI models. Built with ?? by Om Diaries.
?? Badges
License: MIT Laravel PHP AI Powered
? Table of Contents
Installation
Configuration
Mock Mode (No API Key)
Usage Example
Output Example
Testing
Contributing
License
?? Installation
composer require omdiaries/laravel-ai-email-assistant
? Configuration
If not auto-published, manually publish the config file:
php artisan vendor:publish --tag=ai-email-config
Add your OpenAI API key in the .env file:
OPENAI_API_KEY=your_api_key_here
You can also modify the default configuration in:
config/ai-email.php
? Mock Mode (No API Key)
If you don?t have an API key or just want to test locally, Mock Mode lets you simulate AI responses.
The package automatically switches to mock mode when: - OPENAI_API_KEY is missing, invalid, or - your API quota is exceeded.
When this happens, a sample AI-generated email will be returned (instead of calling the real API). Perfect for local development or CI/CD testing.
Example .env setup:
# Without real API key (enables Mock Mode)
OPENAI_API_KEY=
AI_EMAIL_MOCK=true
You?ll see a default output like:
Subject: Welcome to OM Diaries
Body: Hello Mike, welcome aboard! This is a sample AI email generated in mock mode.
? Usage Example
use AIEmail;
$email = AIEmail::generate('welcome', [
'customer_name' => 'Mike',
'product' => 'Pro Plan',
'company_name' => 'OM Diaries'
], ['tone' => 'friendly']);
? Output Example
Hi Mike,
Welcome to OM Diaries! We're thrilled to have you on our Pro Plan.
Get ready for smarter communication powered by AI.
Cheers,
The OM Diaries Team
? Testing
You can test it quickly via a route in web.php:
Route::get('/test-ai-email', function () {
$email = AIEmail::generate('welcome', [
'customer_name' => 'Mike',
'product' => 'Pro Plan',
'company_name' => 'OM Diaries'
]);
return nl2br($email);
});
Then visit:
http://yourapp.test/test-ai-email
? Contributing
Contributions are welcome! If you?d like to improve this package, feel free to fork the repo and create a pull request.
? License
This project is open-sourced under the MIT License.
Why migrate to laravel
Laravel Development Services
Let’s maximize growth chances via the most popular Trioangle’s Laravel web development services. Custom web designs on your hands to get more leads.
Trioangle, a world-class Laravel development company offers services like front-end, back-end, etc. People will find a reliable web development partner to make the website reliable and efficient. This is a place where the Trioangle’s role is an ultimate one. When you work with Trioangle’s experts, you will surely get custom and template-based web designs. Let's find your partner here.
Benefits of Trioangle’s Laravel Web Development Services
Skilled programmers Ecosystem Knowledge Smooth Integration capability Good IP protection Adherence to timeline Clear estimate Streamlined communication
Our Laravel Capabilities
Laravel Solutions You Get
Bespoken Laravel Solutions
Services
Full-Stack Development
With years of experience in Laravel development services, We are specializing in developing the website in a range of things like front/back-end, quick turnaround, smooth iterations, and simple and responsive interfaces. Skill in complete full-stack development makes solutions effective.
Services
Transparent Communication
The timely-tested, content-driven, and agile web solution development is the sequential stage. Transparency in communication in all stages ensures a high-level trust among the entrepreneurs and cryptoreneurs.
Services
Custom Laravel ERP Solutions
Manage, integrate and plan for the organization, the role of ERP is an essential thing. The role of ERP heavily lies in the financial industry with main operations like receivable, payable, cash management, and fixed asset management.
Services
Laravel Integrations
Wish to build the website in PHP and use multiple third-party APIs? Laravel is a good choice. Added with many metrics, Laravel supports third-party solutions like AWS, stripe, and PayPal, Our Laravel programmers build the secure APIs as per need.
Services
Best CMS Platform
We adhere to the MVC coding guidelines and the standards of Laravel web development. Offering various kinds of Laravel web design solutions, We transform the industries like healthcare, engineering, automotive, and retail into next-level.
Services
Laravel Package Development
Are you looking for Laravel developers for your project? Here is your Laravel web package. By doing customizations, our packages are the primary ways of adding new functionalities to Laravel. Our custom package creation uses packalyst.
Laravel Forge


- Rapid Server Provisioning: Spin up new servers on cloud providers in minutes.
- Simplified Deployment: Automates code deployment from Git (GitHub, Bitbucket, GitLab) with options for manual, automatic, or webhook triggers.
- Automatic Security: Handles free SSL certificates (Let's Encrypt), firewall (UFW) setup, and OS updates.
- Full Control: Offers web-based SSH, database management (MySQL, PostgreSQL), queue management (Redis), and custom server scripting.
- Broad Compatibility: Manages apps built with Laravel, WordPress, Symfony, Node.js, and more.
- Zero Downtime: Built-in features for seamless updates.


- Connect Providers: Link your cloud accounts (e.g., DigitalOcean, AWS) to Forge.
- Provision Server: Select server size and type (web, database, cache) through the Forge dashboard.
- Create Site: Add your application, connect your Git repository, and configure domain settings.
- Deploy: Trigger deployments from Forge, instantly pushing updates to your live server.
Laravel Vapor
- Serverless Architecture: Your application runs on AWS Lambda, meaning you don't need to manage servers, and the infrastructure automatically scales based on demand.
- Zero-Downtime Deployments: Vapor enables atomic, zero-downtime deployments and rollbacks, ensuring high availability.
- Resource Management: It provides tools for managing various AWS resources directly, including RDS and Aurora Serverless databases, Redis cache clusters, SQS queues, and S3 storage.
- Asset Management: During deployment, assets are automatically uploaded to an S3 bucket and served via Amazon CloudFront CDN for improved performance.
- Custom Domains and DNS: Vapor simplifies the process of configuring custom domains, SSL certificates, and DNS records through its dashboard.
- Monitoring and Metrics: The platform offers a built-in dashboard (Vapor UI) to view application logs, failed queue jobs, and performance metrics.
- CI/CD Friendly: The Vapor CLI is installed locally within your project, making it easy to integrate with continuous integration platforms like GitHub Actions or Chipper CI.
- Installation: You install the Vapor CLI client as a Composer dependency in your Laravel project.
- Configuration: You link your AWS account to your Vapor team and define your project's infrastructure (like databases and cache) in a
vapor.ymlfile. - Deployment: When you run
vapor deploy production(or another environment), the CLI packages your application, uploads it to S3, and configures AWS Lambda and other services (e.g., API Gateway or Load Balancers) to run your application.
silviolleite/laravel-pwa vs erag/laravel-pwa
silviolleite/laravel-pwa and erag/laravel-pwa are popular packages for integrating PWA features into Laravel, but erag/laravel-pwa is a more modern, maintained, and feature-rich option, especially for recent Laravel versions.
| Feature |
|---|
silviolleite/laravel-pwa |
erag/laravel-pwa |
|
|---|---|---|
| Current Maintenance | Less actively maintained; recent activity involved pull request merges rather than significant feature additions. | Actively maintained with recent updates and new features. |
| Laravel Support | Primarily supports older versions of Laravel (e.g., Laravel 5.x through 8.x). | Supports modern Laravel 8, 9, 10, 11, and 12. |
| Setup & Commands | Requires manual publishing of configuration files and a standard vendor:publish command. |
Offers a streamlined php artisan erag:install-pwa command for easier setup and an erag:pwa-update-manifest command for updating. |
| Key Functionality | A basic implementation that generates the necessary manifest and service worker files, but may require manual adjustments for specific use cases (e.g., in local environments). | Automatically generates manifest.json and service-worker.js, includes Blade directives, and supports dynamic features like an install button and logo changes. |
| Frontend Integration | General Laravel support. | Explicitly works well with modern stacks like Vue.js and React.js. |
- Use
erag/laravel-pwaif you are using a recent version of Laravel (8+) and want a well-maintained, modern package with easy installation and advanced features. - Use
silviolleite/laravel-pwaonly if you are working with a legacy Laravel application and need a simple, basic PWA implementation.
Steps to Add PWA Functionality in laravel website
silviolleite/laravel-pwa or erag/laravel-pwa. This automates the creation of the necessary manifest file and service worker script.
- A running Laravel application (version 8.x or higher is typically supported by recent packages).
- Your application must be served over HTTPS (required for service workers to function correctly), even in local development using tools like Laravel Valet or Homestead.
- Composer installed.
- Install the PWA Package
Install the desired package via Composer in your project's root directory. The following steps usesilviolleite/laravel-pwaas an example:bash
composer require silviolleite/laravelpwa
Alternatively, you can use the erag/laravel-pwa package:
-
composer require erag/laravel-pwa - Publish Configuration Files and Assets
After installation, publish the vendor assets to make the configuration files and default service worker/manifest files available in your project'sconfig/andpublic/directories:bash
php artisan vendor:publish --provider="LaravelPWA\\Providers\\LaravelPWAServiceProvider"
For the erag/laravel-pwa package, you would run:
-
php artisan erag:install-pwa - Configure the Manifest
A new configuration file (config/laravelpwa.phporconfig/pwa.php) will be created. Customize this file to define your app's metadata:nameandshort_name: The name displayed on the user's home screen.start_url: The URL the PWA should load when launched (usually/).display: Set tostandaloneto give it a native app feel without a browser address bar. Other options includefullscreen,minimal-ui, orbrowser.theme_colorandbackground_color: Define the colors for the OS UI elements and the splash screen.icons: Specify the paths and sizes for various application icons and splash screens. You need to place your own images in thepublic/images/iconsdirectory, ensuring sizes like 192x192px and 512x512px are available.
- Include Blade Directive in Layout
To link the manifest file and register the service worker in the browser, add the provided Blade directive within the<head>section of your main layout file (e.g.,resources/views/layouts/app.blade.php):html -
<!DOCTYPE html> <html lang="en"> <head> @laravelPWA <!-- For silviolleite package --> {{-- or use @PwaHead for erag package --}} ... </head> <body> ... {{-- For erag package, add this before the closing </body> tag --}} {{-- @RegisterServiceWorkerScript --}} </body> </html> - Customize the Service Worker (Optional but Recommended)
The published assets include a default service worker file (usuallypublic/serviceworker.jsorpublic/sw.js). This file controls caching strategies for offline functionality. You can customize it to pre-cache specific assets (CSS, JS, images, an offline page) or set up runtime caching for dynamic content:- Define an offline route in
routes/web.phpthat serves a custom offline view in case of a network failure.
- Define an offline route in
- Test Your PWA
- Deploy your application to a hosting environment that uses HTTPS.
- Open your website in a Chromium-based browser (like Chrome or Edge).
- Open Chrome DevTools (right-click and select "Inspect") and navigate to the Lighthouse tab. Generate a report for "Progressive Web App" to check if all criteria are met.
- You should see an "Install App" or "Add to Home screen" prompt in the browser's address bar or menu, confirming installability
Implementing the erag/laravel-pwa package
erag/laravel-pwa package involves a few quick steps using Composer and Blade directives.
- A Laravel application (version 8.x to 12.x supported).
- Composer for package installation.
- An HTTPS connection in production for PWA features to work correctly.
- Install the Package via Composer
Open your terminal and run the following command in your Laravel project's root directory:bash -
composer require erag/laravel-pwa - Run the Installation Command
Publish the necessary configuration files and assets using the provided Artisan command:bash -
This command creates aphp artisan erag:install-pwaconfig/pwa.phpfile and the required manifest/service worker files. - Configure Your PWA
Customize theconfig/pwa.phpfile to match your application's branding and requirements. Key elements you can modify include the app name, short name, colors, and icon paths.Example configuration snippet:php -
Make sure the// config/pwa.php return [ 'manifest' => [ 'name' => 'Your App Name', 'short_name' => 'App', 'background_color' => '#FFFFFF', 'theme_color' => '#000000', // ... other options ], // ... ];public/folder is writable. - Update Your Layout Files
To integrate the PWA functionality, add the provided Blade directives to your main layout file (e.g.,resources/views/layouts/app.blade.php).- Place
@PwaHeadinside the<head>tag to include meta tags and manifest links:html
- Place
-
<head> @PwaHead <title>Your App Title</title> <!-- Other head elements --> </head> - Place
@RegisterServiceWorkerScriptjust before the closing</body>tag to register the service worker:html -
-
<body>
    <!-- Your application content -->
    @RegisterServiceWorkerScript
</body>
-
- Update the Manifest
After making configuration changes, especially the icons or name, run this command to update the manifest file in your public directory:bash
php artisan erag:pwa-update-manifest
- Deployment: For local testing, use a development environment that supports HTTPS, such as Laravel Valet or Laravel Homestead.
- Audit: Use the Lighthouse tool in Chrome DevTools to audit your PWA and ensure all requirements are met.
launch_handler in manifest of PWA
launch_handler member in a Progressive Web App (PWA) manifest is part of the Launch Handler API, which allows you to control how the PWA is launched—specifically, whether it opens in a new window or reuses an existing one, and how it handles the target URL.
window.launchQueue API must be used in conjunction for robust handling. launch_handler member to your manifest.json file with a client_mode subfield: {
"name": "My PWA App",
"start_url": "/",
"display": "standalone",
"launch_handler": {
"client_mode": "focus-existing"
}
}
client_mode Valuesclient_mode field determines the launch behavior. The available values are: auto: The default behavior. The user agent (browser) decides the best context for the platform (e.g.,navigate-existingon mobile,navigate-newon desktop).focus-existing: If an app instance is already running, it is brought into focus. The target URL is made available to the app viawindow.launchQueuebut the navigation does not happen automatically, allowing you to handle it with custom JavaScript.navigate-existing: If an app instance is running, it is brought into focus and navigated to the launch target URL. The URL is still available viawindow.launchQueuefor additional handling.navigate-new: The PWA always opens in a new web app window (or a new browsing context within the app) to load the target URL.
focus-existing or handling files via the file_handlers API, you use the window.launchQueue.setConsumer() method in your application's JavaScript code: if ('launchQueue' in window) {
window.launchQueue.setConsumer(launchParams => {
// Check if there's a target URL or files to handle
if (launchParams.targetURL) {
const url = new URL(launchParams.targetURL);
// Implement custom routing or logic based on the URL
console.log('Launched with URL:', url.pathname);
}
if (launchParams.files) {
// Handle file system handles
for (const fileHandle of launchParams.files) {
console.log('Handling file:', fileHandle.name);
}
}
});
}
import an SQL file
php artisan command to directly import an SQL file, you can achieve this by either:
- Creating a custom Artisan command that executes the SQL file.
- Using the standard MySQL command-line interface (CLI) tool directly.
php artisan command. - Create a new Artisan command:
bash
-
This createsphp artisan make:command ImportSqlFileapp/Console/Commands/ImportSqlFile.php. - Edit the
handlemethod in the new file:
Place your SQL file in a directory (e.g.,database/sql/dump.sql) and use theDBfacade to run the raw SQL content.php -
<?php namespace App\Console\Commands; use Illuminate\Console\Command; use Illuminate\Support\Facades\DB; class ImportSqlFile extends Command { /** * The name and signature of the console command. * * @var string */ protected $signature = 'db:import-sql'; // Define your command name /** * The console command description. * * @var string */ protected $description = 'Import a specific SQL file into the database'; /** * Execute the console command. * * @return int */ public function handle() { $path = database_path('sql/dump.sql'); // Adjust the path as necessary if (!file_exists($path)) { $this->error('SQL file not found at: ' . $path); return Command::FAILURE; } $this->info('Starting SQL file import...'); // Execute the raw SQL content DB::unprepared(file_get_contents($path)); $this->info('Database import successful.'); return Command::SUCCESS; } } - Run the command:
bash
php artisan db:import-sql
Note: For very large SQL files, directly usingDB::unprepared()might hit PHP memory or execution time limits. In such cases, the MySQL CLI method (Method 2) is more robust.
mysql client directly from your terminal, which is the most reliable way to import large SQL dumps. .sql file), and run the following command. mysql -u [username] -p [database_name] < /path/to/yourfile.sql
[username]with your MySQL username (e.g.,root).[database_name]with the name of your database as defined in your Laravel.envfile./path/to/yourfile.sqlwith the actual path to your SQL dump file.
export a full SQL dump of your database
php artisan command to export a full SQL dump of your database and data. However, Laravel offers commands to manage your database structure via schema dumps or you can use third-party packages and external system commands for full data export.
schema:dump)schema:dump command to export the current database schema (table structures, not data) to an SQL file. This is primarily used to speed up migrations in large projects. - Dump the schema:
bash
-
This command generates anphp artisan schema:dump[connection-name]-schema.sqlfile (e.g.,mysql-schema.sql) in yourdatabase/schemadirectory. The file includes SQL commands equivalent to your migrations. - Dump schema and prune migrations:
bash
php artisan schema:dump --prune
This command generates the SQL file and then deletes all your existing migration files, as they are no longer needed to build the initial schema.
mysqldump command directly or leverage a community package that wraps this functionality. mysqldump (External Command) mysqldump -u [username] -p [database_name] > [filename].sql
- Replace
[username]with your MySQL username. [database_name]is the name of your database.[filename].sqlis the desired output file name and path.- You will be prompted to enter your database password after running the command.
spatie/laravel-backup package is widely recommended. It uses mysqldump internally and provides a simple Artisan command to run backups. - Install the package:
bash
-
composer require spatie/laravel-backup - Run the backup command:
bash
php artisan backup:run
This will create a compressed archive containing the SQL dump and save it in the storage/app/backups directory by default. You can find detailed instructions and configuration options on the official Spatie Laravel Backup documentation page
how to license a laravel application
- License Server: A central system (often another Laravel app) to generate, store, and validate license keys, managing domains/users.
- Client Application: Your main Laravel app that checks its license status via the server/API.
- License Keys: Unique identifiers (UUIDs are common) tied to a product, user, domain, or time.
- Middleware: To enforce checks on routes or specific features.


- Choose Your Approach:
- SaaS/API: Best for control; clients use credentials to access your service.
- Self-Hosted with Key: Use packages or custom code for validation within the app.

- Set Up Your License Server (if applicable):
- Use packages like
laravel-ready/license-serverto manage licenses (add
- Use packages like
- Up Your License Server (if applicable):
- Use packages like
laravel-ready/license-serverto manage licenses (add to domain/user, set expiration, etc.). - The server handles key generation and verification logic.
- Use packages like


- Implement Client-Side Verification:
- Install a client package (e.g.,
shumonpal/laravel-licence-client) or build custom logic. - Publish configuration and point to your license API endpoint in
config/app-licence.php. - Use the package's middleware (e.g.,
LicencedVirifiedMiddleware) in yourKernel.phpto protect routes.
- Install a client package (e.g.,


- Create Activation/Validation Flow:
- During Setup: Prompt user for key; verify against server to enable features/create database tables.
- On Request: Use middleware to check license on every request, caching results for performance.
- Handle License Expiry:
- Restrict features, disable updates, show pop-ups, or revert to basic functionality.
- External API: Keeps your core logic secure and allows for updates/revocation.
- Caching: Cache license status to avoid constant server calls.
- Legal: Consult a lawyer for complex licensing agreements.


laravel-ready/license-server) or API calls, to check keys against domains/users, restrict features, and manage expirations, typically with middleware for real-time checks and caching for performance. You'll need to build logic for key generation, activation/deactivation, and enforce license rules (e.g., per domain, per user, feature gating) within your application's core logic and routes, ensuring secure communication with your license service. - SaaS API: Best for cloud-hosted apps; users pay for API access, restricting direct code access.
- Self-Hosted with Key: For distributed apps (like CodeCanyon); users get a key, and your app validates it. This is where packages shine.
- Use a Package: Packages like
{Link: laravel-ready/license-server https://packagist.org/packages/laravel-ready/license-server}provide a central system for managing licenses (keys, domains, users, expiry). - Create Your Own: Build a separate Laravel app with an API to manage licenses if you prefer full control.
- Key Generation: Generate unique, secure license keys (UUIDs are good).
- Licensing Logic: Define rules (e.g.,
addLicense($product, 'domain.com', $userId, $days, $isLifetime)).
- Client Package: Use a connector package (e.g., shumonpal/laravel-licence-client or create your own) to talk to the server.
- Configuration: Set your license API URL in the client app's config.
- Middleware: Apply a middleware to routes (e.g.,
LicencedVirifiedMiddleware) to check the license on every request or key pages. - Activation/Deactivation: Logic to handle key activation (maybe on first run) and deactivation.
- Feature Restriction: Restrict features (e.g., basic vs. premium) based on license type or expiry.
- Check on Request: Use middleware to intercept requests and verify the license against your server.
- Cache Results: Cache license checks (e.g., for 5 mins) to avoid hitting the server on every request.
- Expiration Handling: Send reminders and restrict access to basic features or disable usage after a grace period.
- User buys your app.
- You generate a key and activate it on your license server for their domain/user.
- User installs the app.
- On first load, the app calls your API with the key.
- API verifies key/domain.
- App uses middleware to check key validity for subsequent requests.
Installation Script
- Create the file: In your project root, create a file named
install.sh. - Add the script logic:
bash
#!/bin/bash # install.sh echo "Starting Laravel Installation..." # 1. Install PHP dependencies composer install --no-interaction --prefer-dist --optimize-autoloader # 2. Setup Environment File if [ ! -f .env ]; then cp .env.example .env echo ".env file created from .env.example" fi # 3. Generate Application Key php artisan key:generate # 4. Install Frontend Dependencies npm install npm run build # 5. Run Database Migrations php artisan migrate --force # 6. Set Permissions chmod -R 775 storage bootstrap/cache chown -R www-data:www-data storage bootstrap/cache echo "Installation Complete!" - Make it executable: Run
chmod +x install.shin your terminal. - Run it: Execute with
./install.sh.
php artisan app:install provides a more integrated experience. - Generate the command:
bash
php artisan make:command InstallApplication - Configure the command: Open
app/Console/Commands/InstallApplication.phpand define the logic:- Signature:
protected $signature = 'app:install'; - Logic: Use
Artisan::call()to run setup tasks.
phppublic function handle() { $this->info('Installing Application...'); $this->call('key:generate'); $this->call('migrate', ['--force' => true]); $this->call('db:seed'); $this->call('storage:link'); $this->info('Application installed successfully!'); } - Signature:
- Environment Validation: Check if the system meets Laravel System Requirements (e.g., PHP version, required extensions like
mbstringoropenssl). - Dependency Management: Ensure
composer installandnpm installare executed. - Storage Permissions: The
storageandbootstrap/cachedirectories must be writable by the web server. - Database Setup: Automate
php artisan migrate --seedto prepare the schema and initial data.
- Web-Based Installers: For non-technical users, you can use packages like LaravelInstaller which provide a WordPress-like wizard
- Web-Based Installers: For non-technical users, you can use packages like LaravelInstaller which provide a WordPress-like wizard in the browser.
- Automated Hosting Templates: Some providers like Hostinger offer one-click templates that automate the entire OS and Laravel stack setup.
- Laravel Herd: For local development on macOS or Windows, Laravel Herd provides a pre-configured environment that eliminates the need for manual installation scripts.
Asynchronous Calls
In Laravel, you can make asynchronous calls in several ways depending on whether you want to run PHP code asynchronously on the server or make async HTTP requests from the client.
Here’s a breakdown with examples:
1. Asynchronous HTTP Requests (Server-Side)
If you want to call an API without blocking execution, you can use Guzzle’s async methods.
use GuzzleHttp\Client;
use GuzzleHttp\Promise;

Route::get('/async-api', function () {
    $client = new Client();

    // Create multiple async requests
    $promise1 = $client->getAsync('https://jsonplaceholder.typicode.com/posts/1');
    $promise2 = $client->getAsync('https://jsonplaceholder.typicode.com/posts/2');

    // Wait for all promises to complete
    $results = Promise\Utils::unwrap([$promise1, $promise2]);

    return [
        'post1' => json_decode($results[0]->getBody(), true),
        'post2' => json_decode($results[1]->getBody(), true),
    ];
});
✅ Non-blocking until you explicitly wait for results.
2. Asynchronous Jobs (Background Processing)
If you want to run heavy tasks without blocking the request, use Laravel Queues.
// Create a job
php artisan make:job ProcessReportJob
app/Jobs/ProcessReportJob.php
namespace App\Jobs;

use Illuminate\Bus\Queueable;
use Illuminate\Contracts\Queue\ShouldQueue;
use Illuminate\Queue\InteractsWithQueue;
use Illuminate\Queue\SerializesModels;

class ProcessReportJob implements ShouldQueue
{
    use InteractsWithQueue, Queueable, SerializesModels;

    public function handle()
    {
        // Heavy processing logic here
        \Log::info("Report processed asynchronously.");
    }
}
Dispatch the job asynchronously:
Php
use App\Jobs\ProcessReportJob;

Route::get('/run-job', function () {
    ProcessReportJob::dispatch();
    return 'Job dispatched!';
});
Run the queue worker:
Bash
php artisan queue:work
✅ This is the Laravel-recommended way for async server tasks.
3. Laravel 10+ / 11+ Process Async Execution
Laravel’s Process facade can run commands asynchronously.
use Illuminate\Support\Facades\Process;

Route::get('/async-process', function () {
    $process = Process::start('php artisan schedule:run');

    // Do other work here while process runs
    return 'Process started!';
});
✅ Useful for running shell commands without blocking.
4. Client-Side Async Calls (AJAX / Axios)
If you just want async calls from the browser, use JavaScript:
axios.get('/api/data')
    .then(response => {
        console.log(response.data);
    })
    .catch(error => {
        console.error(error);
    });
✅ This keeps the Laravel backend fast and responsive.
💡 Best Practice:
- For long-running PHP tasks → Use Queues.
- For parallel API calls → Use Guzzle async.
- For non-blocking shell commands → Use Laravel Process.
- For frontend async → Use AJAX / Axios / Fetch API.
Laravel Request LifeCycle
Laravel request lifecycle in simple terms
- Entry Point Every request is directed by the web server (Apache or Nginx) to the single entry point: the
public/index.phpfile. This script loads the Composer autoloader to make all necessary classes available and retrieves an instance of the Laravel application. - Kernel The incoming request is then sent to the HTTP kernel (
App\Http\Kernelinapp/Http/Kernel.php). The kernel acts as a central dispatcher and defines an array of "bootstrappers" that run first to configure error handling, logging, and the application environment. - Middleware The HTTP kernel is also responsible for routing the request through the application's global middleware stack. Middleware are filters that can inspect, modify, or even reject the request (e.g., for authentication, CSRF verification, or maintenance mode checks) before it reaches the core application logic.
- Service Providers A crucial bootstrapping action is loading the application's service providers. Service providers are the "heart" of the framework; they register and configure all of Laravel's components, such as the database, queue, and routing services, making them available in the service container.
- Routing Once the application is fully bootstrapped, the request is handed to the router. The router matches the incoming request's URL and HTTP method to a specific route defined in files like
routes/web.phporroutes/api.php. - Controller/Logic Execution If a matching route is found, the associated controller method or closure is executed. This is where your application's business logic runs, typically involving fetching data from the database (using Models) and preparing the data for the final output.
- Response The controller returns a response (which could be an HTML view, JSON data, or a redirect). This response object then travels back through any route-specific middleware, allowing for final modifications.
- Sending the Response Finally, the HTTP kernel's
handlemethod returns the response, which is then sent back to the user's browser or client by thepublic/index.phpfile, completing the lifecycle
Design an API for an eCommerce order system
POST, GET, PUT, and DELETE to manage resources. The API should be organized around core entities like orders, products, customers, and payments to facilitate various e-commerce operations.orders endpoints manage the lifecycle of an order, from creation to status updates.| Method | Endpoint | Description |
|---|---|---|
POST |
/api/orders |
Create a new order. The request body would contain items, customer details, and shipping information. This would be initiated when a user checks out. |
GET |
/api/orders/{orderId} |
Retrieve a specific order's details. Provides order status, items purchased, total price, and shipping details. |
GET |
/api/orders?customerId={customerId} |
List all orders for a specific customer. Useful for displaying a user's order history. |
PUT |
/api/orders/{orderId}/status |
Update the status of an order. Used internally (e.g., by the fulfillment system) to change status to "Processing", "Shipped", or "Delivered". |
DELETE |
/api/orders/{orderId} |
Cancel an order. Only allowed if the order is in a specific initial status (e.g., "Pending" or "Created"). |
| Method | Endpoint | Description |
|---|---|---|
GET |
/api/products |
List all available products (with pagination and filtering options). |
GET |
/api/products/{productId} |
Retrieve details of a single product, including price, description, and inventory levels. |
GET |
/api/products?category={category} |
Filter products by category. |
PUT |
/api/products/{productId}/stock |
Update product inventory levels. Used by inventory management systems. |
| Method | Endpoint | Description |
|---|---|---|
POST |
/api/customers/register |
Create a new customer account. |
POST |
/api/customers/login |
Authenticate a customer and provide an access token (e.g., JWT). |
GET |
/api/customers/{customerId} |
Retrieve customer profile information. |
PUT |
/api/customers/{customerId} |
Update customer details, such as address or contact information. |
| Method | Endpoint | Description |
|---|---|---|
POST |
/api/orders/{orderId}/payments |
Initiate a payment for a specific order. The request would likely include a payment token from a provider like Stripe or PayPal. |
GET |
/api/orders/{orderId}/payments/{paymentId} |
Retrieve the status of a specific payment. |
POST |
/api/webhooks/payment-status |
Webhook endpoint for payment providers to notify the system of successful or failed payments asynchronously. |
| Method | Endpoint | Description |
|---|---|---|
GET |
/api/carts/{cartId} |
Retrieve the contents of a shopping cart. |
POST |
/api/carts/{cartId}/items |
Add a product to the cart. |
DELETE |
/api/carts/{cartId}/items/{itemId} |
Remove an item from the cart. |
- RESTful Design: The API uses predictable, resource-oriented URLs.
- HTTP Verbs: Standard HTTP methods map to CRUD operations (Create, Read, Update, Delete).
- Status Codes: Utilize standard HTTP status codes (e.g.,
200 OKfor success,201 Createdfor new resources,404 Not Foundfor missing resources,400 Bad Requestfor invalid input,401 Unauthorizedfor authentication errors). - Authentication & Authorization: Use OAuth 2.0 or similar token-based authentication to secure endpoints, ensuring only authorized users can access or modify their orders.
- Data Formats: Exchange data primarily in JSON format, which is lightweight and widely supported.
- Versioning: Include a version number in the URL (e.g.,
/api/v1/...) to allow for future changes without breaking existing integrations.
What are the steps to secure a REST API in Laravel?
- Laravel Sanctum: Recommended for single-page applications (SPAs), mobile apps, and simple token-based APIs.
- Installation: Run
composer require laravel/sanctumand thenphp artisan migrateto publish and run the necessary migrations. - Configuration: Add the
HasApiTokenstrait to yourApp\Models\Usermodel. - Usage: After a user logs in (typically through a standard login endpoint), generate a token using
$user->createToken('token-name')->plainTextTokenand return it to the client. - Protection: Protect your API routes by applying the
auth:sanctummiddleware in yourroutes/api.phpfile.
- Installation: Run
- Laravel Passport: Use this if your application requires a full OAuth2 server implementation and supports third-party clients. It provides more complex features and flows.


- Use
FormRequestclasses for cleaner and reusable validation logic. - Employ Laravel's built-in validation rules (e.g.,
required,email,min:8). - Laravel's Eloquent ORM and Query Builder automatically use parameter binding, which helps protect against SQL injection.
- Apply the built-in
throttlemiddleware to your API routes, for example:Route::middleware('throttle:60,1')->group(...)to limit to 60 requests per minute.


- Use Laravel's Gates and Policies to implement role-based access control (RBAC) and fine-grained permissions for user actions.
- For Sanctum, you can define and check token "abilities" to control access to specific actions.

- Use HTTPS: Enforce SSL/TLS encryption for all API communications to protect data in transit from man-in-the-middle (MITM) attacks.
- Environment Variables: Store all sensitive information, such as API keys and database credentials, in the
.envfile and never hardcode them in your source code. - Disable Debug Mode: Set
APP_DEBUG=falsein your production environment to prevent exposing sensitive application details and stack traces to potential attackers.

- Configure Laravel's logging settings to track API activity and errors.
- Consider using monitoring tools like Laravel Telescope for real-time insights during development and services like Sentry for production error monitoring